Tuesday, December 25, 2012

'Lil Man Mustache Bash {Baby Shower}

My friend Megan is having a boy! 
And we had a mustache bash for 'lil man!

A boy baby shower doesn't need too many decorations, but I still wanted to make it as cute as I could. Since mustaches are the fad right now, I ran into a lot of cute ideas for a Mustache Bash of a 'Lil Man shower and so I decided to go for it. 
I am glad I did because it turned out to be a super cute shower!
I LOVE name banners and I LOVE that I was able to pull this off!  I created ties with stripes, spots and diamonds, cut them out, put baby's name on them and hot glued them to a piece of yarn.  I tied dowel rods to each end of the yarn and used vases filled with sand (from my new pool going in out back) to keep them standing upright.  This worked amazingly!  The tie banner made a perfect centerpiece for the food table and background for the cake. 

And in case you are wondering, the baby's name is Cays, pronounced Case. 

Even though I have taken a few cake decorating classes myself, a friend of the momma-to-be volunteered to make the cake, and with my busy schedule right now and the holidays, I let her take it! 

She did a great job with the cake...and you can never go wrong with Hershey's Kisses...right?  I always like to add a few Kisses to the party.
Wet Your Whiskers! 

That is what the sign says next to the punch bowl...thought that was cute!
And what little man party is complete without ties and bow ties?  I folded napkins to look like bow ties and then cut small green strips of paper with pinking shears and taped them in place to complete the bow tie.  

So simple and they looked so much better than I thought they would.  I don't know if anyone actually used them or not, but whether they did or didn't, they were a great little accessory to lay around the tables.
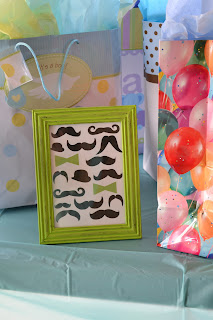
Another simple, yet perfectly placed decoration...I took a few frames from the Dollar Tree and painted them in different colors of greens and blues to match the shower.  I then created mustache and bow tie prints on my computer to place inside the painted frames and put along the food and gift tables.  Simply...perfect!
And who doesn't have a photo booth now days?  Well, I didn't go all out on a photo booth, but I did make some mustache and glasses props with a disposable camera for the party guests to use.  A little chalkboard sign next to the items states "We mustache you to take a pic".  How cute is that? 

Of course, the younger guests had a blast playing with the props and taking pictures, but even some of the adults had a good time too...AND we got a picture of each of the great-grandmothers with a 'stache for the baby book.  What a great and funny memory to look back on!
Last, but definitely now least...the Food!  We had a brunch with bagels, fruit and juice, but you have to  have sweets at a baby shower. 

Sticking to the blue and green colored theme, I found some blue cotton candy ~ Yum!
A shower is not a shower without cake and PUNCH of course.  Now, I have made many different kinds of punch for many different types of showers and parties, but I have to say that my all time favorite punch, especially when serving cake, is sherbet and 7-Up.  I am unaware of any blue sherbet and so I chose lime and let me tell you...it was yummy as always!  Makes me want to make some right now!
Here are the invitations that I made last minute for the shower.  They turned out pretty good considering I had to create them, address them and get them sent out in less than two days!
And look at the cutie tie inserts that I made to go in the invitations.  These are to let guests know to bring a book instead of a card to the shower.  We did this for my sister-in-law a few years back and I really liked it.  Her baby girl had a great collection of books before she was even born!
We had a great time at the shower and it turned out to be pretty danged cute.  Hopefully you can use some of my ideas and creations to have a Mustache Bash of your own! 

Wednesday, December 12, 2012

Pumpkin Pie Croissant

Thanksgiving may be over, but that doesn't mean that we have to let go of the pumpkin yet!  Pumpkin treats are some of my favorite and I love this time of year when pumpkin recipes and pumpkin stock are in abundance.

I found a recipe for pumpkin pie croissants on Pinterest (of course) and last night I made some modifications to make it more 'diet' friendly.  If you like sweet treats with pumpkin then you will love this...it is a great treat for one when you know you won't have the control to keep yourself from eating an entire pie if you make it.  Although, you may find that you can't keep your self from eating the entire batch of these either....which is why I only made a half batch for my first round...and because I only had one can of crescent rolls in the fridge.
Pumpkin Pie Croissants

Servings: 16  WW Pts+: 4
You will need:
  • 2 tubes of reduced-fat crescent rolls
  • 4 oz reduced-fat cream cheese (1/2 of a block)
  • 1 can pumpkin (not pumpkin pie mix)
  • pumpkin pie spice to taste
  • 5 tbsp sugar or sweetener
Mix together pumpkin, cream cheese, pumpkin pie spice and half of the sugar.  Beat together until well blended and creamy. 

Roll out the crescent rolls and spread an even amount of filling onto each one.  Probably a tablespoon or so to start with and then even it out. 

Roll up each roll and place on a cookie sheet.  Use the remaining sugar to sprinkle on top of each roll and then top each roll with a dash of pumpkin pie spice. 
Bake in the oven for 15 minutes at 375°F.

If you opt for fat-free cream cheese, the points reduce to 3 per roll.
I got mine a little brown, but they were fantastic anyway!  After you are done eating you still get a little taste of sugar when you lick your lips ~ Yum!

Tuesday, December 11, 2012

Shredded Chicken Tacos {Crockpot Recipe}

 I have been trying to find easy dinner recipes that can be baked in the oven as casseroles or in the crockpot.  I love that you can put something in the crockpot and let it cook all day while you are at work and then you don't have much to do when you get home.  I am always ready to eat by the time I get home from work and daycare!

Oh, and I love Mexican food and so a crockpot recipe that is Mexican too can't be anything but wonderful in my book.  This is actually the second time that I have made this and both times it was amazingly good! 

Chicken in the crockpot is so tender...I absolutely love chicken cooked in the crockpot and the way that it is shredded.  I am a little bit, ok A LOT, particular when it comes to the texture of my food and I just love the texture of shredded chicken!

This is great served in a tortilla or on top of a bowl of rice!  I tried to make some lime cilantro rice like Qdoba at home and well, let's just say it didn't make the blog.  FAIL!  But if you can make a good rice or just want to use plain ol' white rice (the chicken will give it some flavor) then go for it.  For now I will stick to a tortilla... 
Crockpot
Shredded Chicken Tacos
You will need:
  • 3 or 4 chicken breasts
  • 1 package taco seasoning
  • 1 can Rotel
  • 1/4 cup olive oil
  • 1/4 cup water
  • 6-8 flour tortillas
Optional Toppings:
  • shredded cheese
  • sour cream
  • avocado
First of all, I ALWAYS ALWAYS use a slow cooker liner when cooking in the crockpot.  If you don't use one now you will see what I mean after the first time...you will never want to cook without one again!
Next, sprinkle the taco seasoning in the bottom of the crockpot and place the chicken breasts on top.  I like to thaw my chicken the night before so that I can cut ALL of the fat off before cooking it!  Lastly, pour in the Rotel, oil and water and turn on the low setting.  You don't even have to mix it!
This will cook on low for 6-8 hours, but honestly by the time I leave the house and go to daycare on the way to and from work it is more like 10 hours before I get home!  That just makes it even more tender.
 
Before serving, take a fork and shred the chicken while still in the crockpot and mix together with the juices.  Go ahead and get the rest of your toppings ready while it cooks a little longer and when your toppingsare ready to go your chicken will be ready to serve!
This recipe yields 6-8 servings at about 4 WW Pts+ depending on the amount of chicken that you cook.  The Pts+ value can be greatly reduced by removing the olive oil, but for now I have left it in.

Enjoy your chicken tacos or rice bowl!

Click here for a printable version.

Monday, December 10, 2012

Party Planning {Printable}

Party Planning can be fun...it can also be very overwhelming and frustrating too if you don't have the right tools.  I have been planning a few parties recently and have felt super unorganized about it and if there is one thing I DO NOT like, it is being unorganized! 

I do love planning parties...the decor, the invitations, the games, etc. but I have been doing more than one at a time which has allowed me to get a little off track.  I tried to find a party printable online, but there just wasn't one that fit my needs or that made a lot of sense. 

And so...I created my own printable to use.  So far, they have been working great!  Click on the links below to download a printable version which can be edited and typed into directly for easy updating and printing.

 
Party Printable #2

I used the Sahlin Studio The Carefree Day scrapbooking kit to design my activity planning worksheets.  You can download this kit for free personal use here:

Enjoy!